One of the often overlooked factors when it comes to niche site creation is tweaking your site for better performance. That could be for a number of reasons, but my thought is that it is primarily due to a lack of knowledge in exactly how to go about it.
In this post, I will provide you with some specific suggestions and steps on how you may be able to quickly improve your own site performance by 70% or more.
I was able to increase the performance of this site by 72% in less than 30 minutes, by utilizing the free tools and steps I will show you below and my hope is that you can experience similar results.
Why Website Performance Matters
Before I get right into the steps, I wanted to provide you a brief background on why website performance should be on your radar screen.
Kissmetrics published an InfoGraphic on the topic of Page Speed, based on a research report from Akamai and Gomez.
The graphic shows that for average visitors, 25% will abandon a site that takes more than 4 seconds to load.
For online shoppers, 47% expect an eCommerce site to load in under 2 seconds and 40% will abandon a site that takes more than 3 seconds to load. A 1 second delay can result in a 7% decrease in conversions.
You can clearly see that speed is of the utmost importance.
When you set out to create a niche site, traffic, rankings and conversions are probably at the top of your list when it comes to determining whether your site is successful or not.
A huge benefit of improving website load times is that you can positively affect all 3 elements in one shot!
Since page speed is a factor in Google’s algorithm, excellent load times can help to improve your rankings, which will increase organic traffic.
Improved page speed will also give your visitors a better user experience, helping to decrease your bounce rate and increase conversions.
There are lots of different ways to monitor and tweak performance. Today I will show you the exact steps I took to increase my site performance utilizing two free tools, GTMetrix and W3 Total Cache.
I am by no means saying these are the only tools or even that they are the best tools out there, they are merely two popular tools that I looked into, tried and had positive results with and I hope you will too.
Improving Website Performance With GTmetrix
GTmetrix is a free tool, which you can utilize either via browser or as a WP Plugin. GTmetrix will check your site speed utilizing both the Google Page Speed and Yahoo Yslow methods.
The WP plugin allows you to check your site performance right in your WordPress dashboard. You can also schedule reports to run on a daily/weekly/monthly basis. However, since utilizing the plugin isn’t required and minimizing the amount of plugins that you have is another way to keep site performance up, I would opt for utilizing their website instead.
For purposes of this post, I am utilizing their website, GTMetrix.com. You can create a free account to store your data if you prefer, but that is not a requirement.
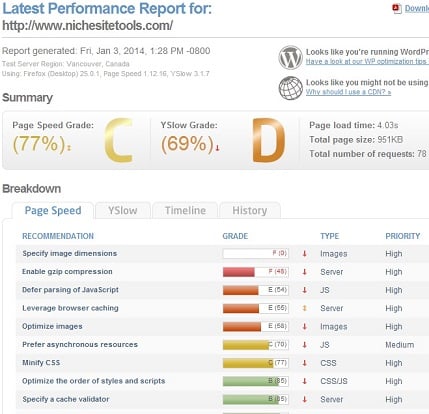
Go to the GTmetrix website and put in your site URL in the box that appears. Plugging in my site initially, returned the following results:
Page load time was 4.03 seconds with a grade of C on the Google Page Speed tab, along with a grade of D on the Yslow tab. Not so great.
On the Page Speed and Yslow tabs, you will see a breakdown of the factors that are resulting in slow performance, the biggest problems with the worst grades are listed at the top. Those are the items that you should concentrate on resolving, to get the most benefit.
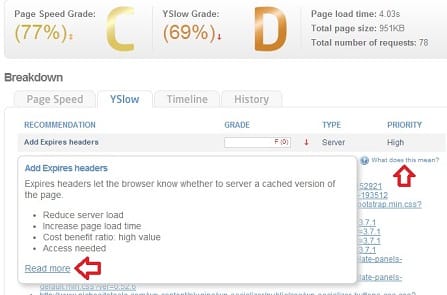
The cool part is that you can click on each of the items and get an explanation of the issue and can then click on “What does this mean?” and then the “Read more” link and you will be provided with a detailed breakdown of exactly how you can go about fixing the issues as shown here:
Since everyone’s results will vary, I won’t go into the specifics of each and every item listed on my report, but I will show you the exact changes that I made.
The changes that I made as a result of the GTmetrix report were to enable gzip compression and to enable expires headers, which overlapped with enabling browser caching as well. I followed the suggestions provided in the “Read more” link for each item.
To resolve those 3 issues, the recommended fix was to add several stanzas to the main .htaccess file for your site. I pulled up the cPanel file manager that my web host provides, made a backup copy of the file and then added the following to the bottom of my .htaccess file:
# compress text, HTML, JavaScript, CSS, and XML
AddOutputFilterByType DEFLATE text/plain
AddOutputFilterByType DEFLATE text/html
AddOutputFilterByType DEFLATE text/xml
AddOutputFilterByType DEFLATE text/css
AddOutputFilterByType DEFLATE application/xml
AddOutputFilterByType DEFLATE application/xhtml+xml
AddOutputFilterByType DEFLATE application/rss+xml
AddOutputFilterByType DEFLATE application/javascript
AddOutputFilterByType DEFLATE application/x-javascript

# remove browser bugs
BrowserMatch ^Mozilla/4 gzip-only-text/html
BrowserMatch ^Mozilla/4\.0[678] no-gzip
BrowserMatch \bMSIE !no-gzip !gzip-only-text/html
Header append Vary User-Agent

<IfModule mod_expires.c>
# Enable expirations
ExpiresActive On
# Default directive
ExpiresDefault "access plus 1 month"
# My favicon
ExpiresByType image/x-icon "access plus 1 year"
# Images
ExpiresByType image/gif "access plus 1 month"
ExpiresByType image/png "access plus 1 month"
ExpiresByType image/jpg "access plus 1 month"
ExpiresByType image/jpeg "access plus 1 month"
# CSS
ExpiresByType text/css "access 1 month"
# Javascript
ExpiresByType application/javascript "access plus 1 year"
</IfModule>
Those were the only changes that I made as a result of the suggestions on GTmetrix. Several other items referred to issues that were outside of my direct control.
For example, the suggestion to specify image dimensions were related to images being served by other plugins like my nRelate related posts plugin or my Facebook like box widget and really the only option would be to disable or delete the plugin to clear up those particular issues.
As far as images go, I am always sure to shrink them down via a program like Gimp prior to uploading them to my site. It is always best to shrink them down ahead of time, rather than to have WordPress resize them on the fly.
Improving Website Performance With W3 Total Cache
Enabling caching on your website is a suggestion I’ve seen over and over again, to increase performance of your WP site(s). There are a few main plugins for enabling caching. WP Super Cache is one and W3 Total Cache is the other.
The plugin is very customizable, but rather than get bogged down in the details, I will provide you with the specific recommended settings from my web host, which are the settings I utilized:
Step 1. Install the W3 Total Cache plugin into your WP dashboard; A new option will show in the left hand column of your dashboard entitled Performance.
Step 2. Click on Performance -> General Settings and then click the check boxes for the following items:
Page Cache
Minify
Database Cache
Object Cache
Browser Cache
After you make sure that each setting has been enabled, click on the SAVE ALL SETTINGS button.
Step 3. Then click on Performance -> Page Cache and click the check boxes for these:
Cache front page
Cache feeds: site, categories, tags, comments
Cache 404 (not found) pages
Cache requests only for yourdomain.com site address
Don’t cache pages for logged in users
After you make sure that each setting has been enabled, click on the SAVE ALL SETTINGS button.
Step 4. In order to confirm that W3 Total cache is setup, view your WordPress website, then click on CONTROL-U (control key + the U key on your keyboard), or go toVIEW > PAGE SOURCE. This will open up the source view of the page. Scroll to the bottom of the page and will see a confirmation that looks similar to the one below if the W3 total cache is properly configured:
Results
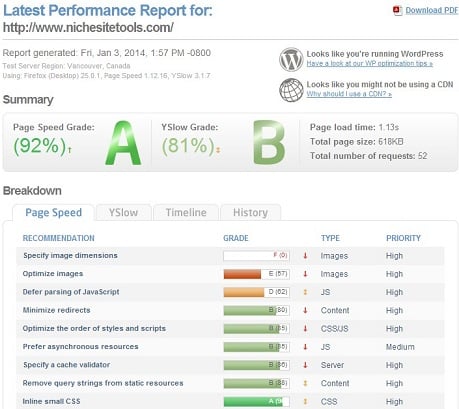
Adding the 3 stanzas to my .htaccess file and enabling the specific settings for W3 Total cache produced the following results:
That was a change from a grade of C/D to an A/B and more importantly, a decrease in page load time from 4.03 seconds to 1.13 seconds, a performance increase of 72%!
Honestly, I was blown away by the results. That was a huge increase in performance with very little time invested. One of the benefits of spending the 30 minutes to come up with the proper performance tweaks for one of your sites is that you can now do the same changes to all of your other niche sites in less than 5 minutes per site.
I am glad to share the results with you, not only so that you can attempt to increase the performance of your own site, but also because this site will now be much faster for everyone. Win-win!
Conclusion
I would love to hear how these tips and suggestions resulted in a performance increase on your own site. Please share any results you experienced in the comments below.
If you have other tips or suggestions to share that have made a dramatic increase in your site performance, or have any questions or suggestions based on my post above, please share those as well. Thanks!


