If you’d like to start a website/online business/blog, you’ve come to the right place!
There has never been a better time to get started online!
Whether you’re looking to create some side income, start a full-fledged online business, or just wanting to write, starting a blog or website is the most important first step towards achieving your goals.
By following the simple steps below, you will have your own blog or website, running on WordPress, in 10 minutes or less.
These are the exact same steps that myself and many others have followed, to get started online.
Steps to Start a Blog
- Sign-up For Web Hosting
- Install WordPress
- Create Your First Post
Step 1 – Sign-Up For Web Hosting
A hosting company provides you with the space to store your blog and all related files online. When it comes to hosting, it is important to pick a great company, with a proven track record, right from the start.
For hosting, I recommend and utilize Namecheap.
That is where all of my websites and domain names are hosted. The price, speed and customer service can’t be beat!
I highly recommend the Stellar package, which will allow you to create 3 sites with unlimited bandwidth for a special discounted price of only $1.98/month for the first year!
Start by clicking here to sign-up with Namecheap at the $1.98 discounted rate.
If you already have a domain name you can enter it there during the sign-up, or you can register a new domain name for less than $10 a year for the first year as well.
Congrats, you now have a domain name and hosting plan, great job so far!
Step 2 – Install WordPress
Follow the steps here to install WordPress via your cPanel account with the one click Softaculous install method here. If you need any assistance, their helpdesk is available via live chat 24/7.
Once the installation is complete, you will set the login/password and be provided with the URL to the WordPress dashboard.
Click the link to login to the Administration Dashboard for your site and enter the login ID and password provided.
After you login, you should see a screen similar to the one below, which is called the WordPress Dashboard. That is where all the magic happens.

The WordPress Dashboard is the location where you go to change the look and feel of your blog and that is also where you’ll go to create your content.
The first thing you need to do is make a few quick changes in to your WordPress settings.
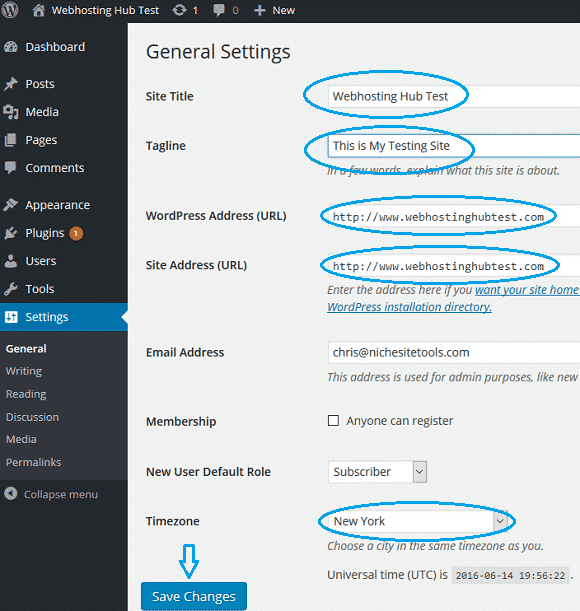
In the WordPress Dashboard, go to Settings on the left hand side, select General and then fill in your site Site Title, Tagline, WordPress Address/Site Address, Timezone and then scroll down and click the ‘Save Changes’ button all the way at the bottom.

I personally like to put in the www before the website address. It is a matter of personal preference. You can do it with or without, just be sure to be consistent when you link to your own internal content.
Then there is just one more quick change to make for your Permalink structure.
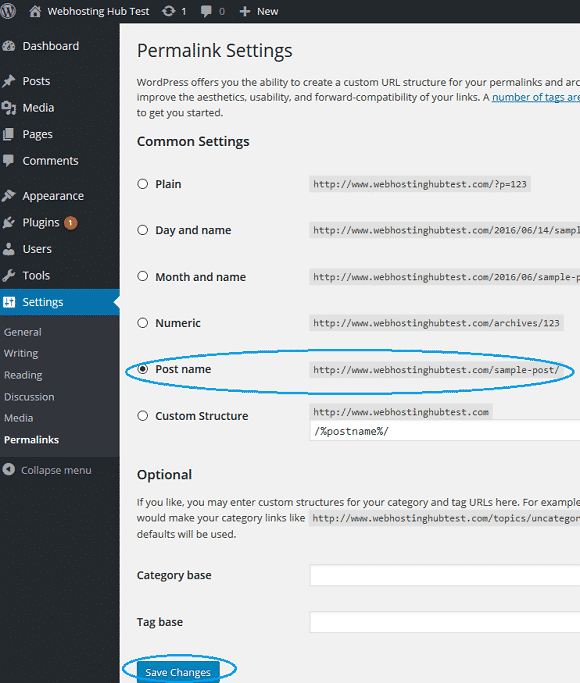
A permalink is just the address people will see when you create a new post or page. By default it is an ugly looking URL that doesn’t do anything to help you with SEO. We want to change it so that the URL contains keywords from your post title.
To change that, go to Settings, Permalinks and then select the ‘Post name’ radio button and click the ‘Save Changes’ button at the bottom of the page.

Congratulations!
You now have a fully functional WordPress blog/website!
You’re now ready to create your first piece of content.
Step 3 – Create your first post
Now that you’ve got your blog setup, you’ll want to begin creating some great content to bring in readers.
If you’re drawing a blank on what to write about, subscribe to my email list to instantly receive my free Keyword Brainstorming guide.
That short eGuide will provide you with my 10 best tips, for coming up with topics to write about.
Once you’ve figured out what to write about, you’ll need to know how to get your content published on your new blog.
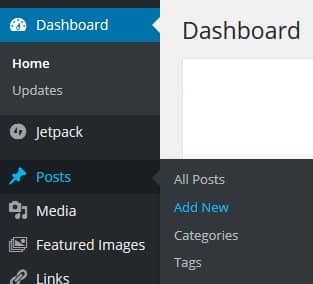
If you want to get some content online in just a few seconds, you can select Posts -> Add New on the left side of your WordPress dashboard.

From there, enter a title and then start typing in the main window in the middle of the screen and hit ‘Publish’ on the right hand side, when done.

Your content will be then be available online. It really is that simple.
Conclusion
If you followed the steps above, you now have a fully functional WordPress blog/website, with some basic content published and it only took a matter of minutes.
You have taken that all important first step, towards realizing your goals and dreams of starting an online blog or website.
The sky is the limit on where you can take things from here!
If you found this post helpful, be sure to subscribe via email for more great content and tips on how to achieve success with your WordPress blog.
If you have any questions, feel free to drop me a comment below or via my contact page.
Thanks and best wishes for success, with all of your blogging adventures!
This site contains affiliate links. If you decide to make a purchase, I may receive a commission, at no additional cost to you.


Thanks Chris, this guide was very helpful. I just got my first site online and am very excited to get started! I also appreciate you responding to my email so quickly. Keep up the great work.
Thanks for the positive feedback Ryan, I greatly appreciate it and congrats on your new site! Looking forward to following your progress along the way and welcome.
Chris recently posted..How to Easily Transfer Your Web Hosting For Free