Podcast: Play in new window | Download
Subscribe: RSS
Search Engine Optimization (SEO), can be a very intimidating concept, especially for beginners, but it really doesn’t have to be!
With these 7 simple tips for on-page SEO, you can quickly and easily set yourself up for the best chance to rank well, right out of the gate.
Tip 1: Optimize Your Title and Post URL (Permalink)
Your article title and URL are of particular importance for SEO. When crafting your title, it is also best to try and make it as catchy as possible, to encourage sharing.
Keep your audience in mind, what would they be typing into Google to find your content?
You can plug your main topic into Google and see what other articles appear at the top of the results. Check out their headlines for some ideas.
You can also start to type in your main topic into the search box and see what other suggestions Google autocomplete provides as well.
Here is a post or two, with additional suggestions for great headlines.
Some examples include:
“Who Else Wants a Great WordPress Theme?”
“Little Known Ways to Save on Your Web Hosting”
“10 Powerful Ways To Increase Facebook Likes”
Permalinks have to do with how your URL is formatted, for posts and pages. Your permalinks should be based on your article title.
To set that properly for WordPress, go into your Dashboard -> Settings -> Permalinks and be sure “Post name” is selected.
Then, when you are working on individual posts or pages, be sure to click on the permalink and modify as needed to shorten the URL.
Your title can be longer and more descriptive, but it is best to shorten the URL, while making sure the your targeted keywords are still accounted for.
Tip 2: Create a Proper Meta Description For Each Post
A meta description is the short summary of your post, that appears below your link, in search engine results.
If you do not specify a meta description, Google will grab the first 156 or so characters of your article, which is usually not ideal.
Instead, you should craft your own attention grabbing summary. You want to help entice others to click through to your article and give them an idea of what they can expect, like the example shown below.
Out of the box, WordPress does not currently provide the option for a meta description for each post or page, but many themes like Elegant Themes and free plugins like WordPress SEO by Yoast do.
My suggestion, having used both themes and plugins that offer the meta description option, would be to utilize a plugin for that feature, rather than your theme.
The reason for that is if you ever decide to change themes down the road, having your meta description handled via plugin makes the switchover a much smoother process, since they are maintained via the plugin, not the theme.
If, on the other hand, the meta description is handled by your theme, you will need a method to migrate those meta descriptions over. There is a plugin that can help accomplish that task called SEO Data Transporter, but there is a much higher potential for issues.
Once you install and active a plugin like WordPress SEO by Yoast, you will then see a new box below the body of your post where you can leave a 156 character summary for your post as shown below.
Enter your summary and it will appear below your post, in the search engine results.
Tip 3: Utilize h1/h2 tags and Bold Text
This is one of the most common ways to place emphasis on individual phrases or sections of your content. It is also one of the easiest. All of the tips on this page are h2 tags.
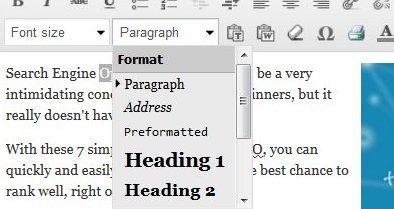
All you need to do is highlight the text you would like to emphasize and grab the Paragraph pull-down and select the appropriate heading size.
I’d recommend going with what looks right. Don’t over-utilize h1 tags just to try and get better rankings, but definitely utilize them where appropriate along with some h2 tags and bold items.
It not only helps boost SEO, but also provides for better readability and a better overall user experience, when done properly.
Tip 4: Add Images and Pay Attention to 3 Key Attributes
Adding an image or two to each post certainly provides for a better reader experience, but it can also provide an added SEO boost as well.
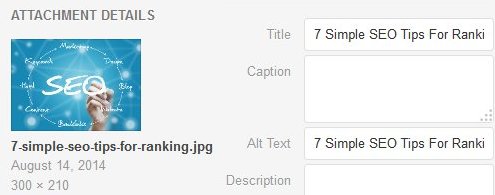
The three key attributes to set for images are the name of the file itself, the image title and the alt-text tag for the image.
These are relatively self-explanatory, but often overlooked gems when it comes to SEO. When Google sees an image on your site, it really doesn’t yet have the intelligence to determine what the subject matter is.
Instead of uploading an image with a file name of img_0001.jpg, make the file name relevant to your post/keywords. Then when uploading the photo into your post via the Add Media button, you will also have the option to specify the title and alt-text tags as shown below.
One bonus tip when it comes to images, you want the images smaller, rather than larger, while still maintaining readability. Be sure to resize and shrink down any images that you post, before uploading them into WordPress.
If you upload your large images “as is” into WordPress and select a smaller size to display in the post, you are forcing WordPress to handle the resizing. This will increase the time it takes for your post to load, which can negatively affect rankings.
You can use free imaging editor software like Gimp to resize your images.
Tip 5: Make Affiliate Links “nofollow”
When you place affiliate links in your articles, you want to be sure to nofollow them. What that means is you are telling Google not to pass any of your link juice out to the product sales page.
Picture your link juice as a finite resource, such as the amount of liquid in a big styrofoam cup. The goal is to keep in as much of that liquid as possible and to add more liquid to the cup by getting natural links into your site over time.
When you link out to external sites without making that link nofollow, picture someone poking holes in the cup with toothpicks each time and having a little bit of that liquid drain out each time.
You can make affiliate links nofollow easily, by utilizing the free Pretty Links Lite plugin. Pretty Links also allows you to make attractive, shorter links as well.
 You can set nofollow as a default, so that all links that you setup with Pretty Link will automatically be nofollow, or you can set that on an individual link basis.
If you use EasyAzon for your Amazon affiliate links, you can and should set nofollow as the default there as well.
If you would like to easily set links to nofollow outside of Pretty Link or EasyAzon, you can install a plugin like Rel Nofollow Checkbox.
Tip 6: Be Sure To Have an XML Sitemap
An XML Sitemap is super important. Here is the description from Google:
“Sitemaps are a way to tell Google about pages on your site we might not otherwise discover. In its simplest terms, an XML Sitemap—usually called Sitemap, with a capital S—is a list of the pages on your website. Creating and submitting a Sitemap helps make sure that Google knows about all the pages on your site, including URLs that may not be discoverable by Google’s normal crawling process.”
In short, it helps Google rank all of your posts and pages. There are a number of different plugins that can create your XML Sitemap automatically, but since WordPress SEO by Yoast has the option built-in, we’ll use that one again here and kill two birds with one stone.
Tip 7: Publish Great Content as Often as Possible
This one is kinda obvious, but it certainly cannot be over-emphasized. Nothing beats truly great content, that provides huge value for your audience!
You can have the best SEO optimized articles in the world and those posts could even rank high for a short period of time, but if folks click through to your site and you aren’t providing value, they’ll leave.
That results in a high bounce rate, which will negatively affect your site and rankings over time.
If on the other hand, you are adding value and solving problems for your audience, they will hang out and stay awhile and you can start to build up a following.
Most folks, myself included, usually recommend creating content on a recurring schedule, usually at least once per week, for best results.
However, frequency isn’t the key factor, quality is. If your time is limited, it is far better to create a really amazing post once per month than it is to just pump out mediocre content on a daily or weekly basis.
Conclusion
In conclusion, here is a quick checklist for your reference:
Tip 1: Optimize Your Title and Post URL
Tip 2: Create a Proper Meta Description For Each Post
Tip 3: Utilize h1/h2 Tags and Bold Text
Tip 4: Add Images and Pay Attention to 3 Key Attributes
Tip 5: Make All Affiliate Links “nofollow”
Tip 6: Be Sure To Have an XML Sitemap
Tip 7: Publish Great Content as Often As Possible
Accomplishing just those 7 simple SEO tips will set you ahead of probably 80-90% of most folks out there. These tasks really take less than a few minutes per post and like most anything, become second nature over time.
On-page SEO does not have to be a daunting task. Hopefully you now have a much better understanding of some of the key factors that can help you rank higher over time and feel more comfortable forging ahead and making progress with your niche sites!
If you have any questions at all about the items above, please don’t hesitate to leave a comment below or reach out via the contact page.
And if you are new to the site, welcome! If you ever get stumped on what to write about or what topic to create a niche site around, you can subscribe via email and instantly get your free eGuide on keyword brainstorming.
In addition, be sure to check out the Podcast and subscribe on either iTunes or Stitcher. If you enjoy the show, I’d greatly appreciate some more positive reviews!
Ratings and reviews really help get the show more visibility and provide me with that much needed feedback and motivation to keep pumping out more great content for you guys in the future.
Please share the show with your friends, family or anyone you feel would benefit from listening!
Thanks so much and best of luck with all of your online adventures!


